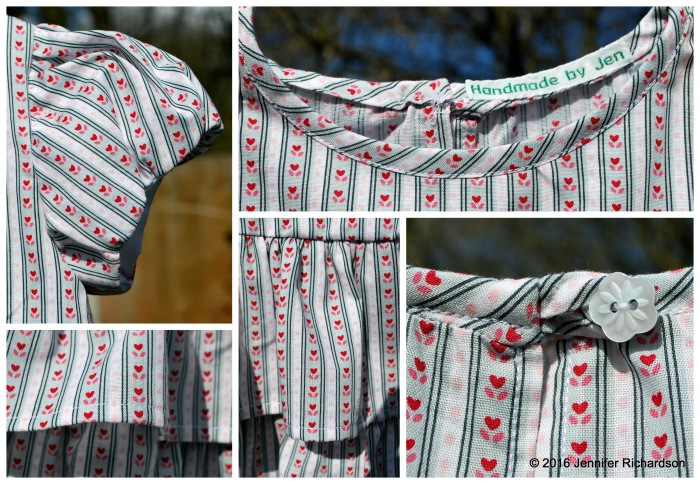
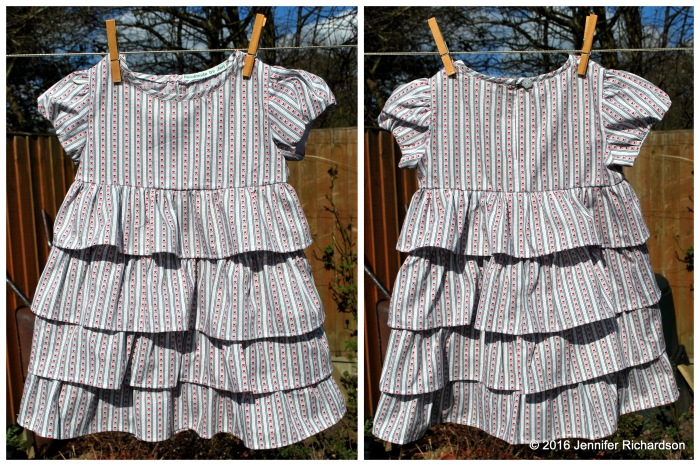
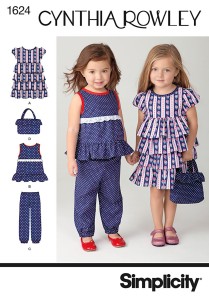
I couldn’t resist buying Simplicity 1624 when I saw it in a half-price sale on the Simplicity New Look website a while back. I loved the little ruffle dress with the puffed sleeves and thought my niece would look adorable in it!
However, this is one of those patterns where I struggled to see the dress in anything other than the fabric used on the front of the pattern! I therefore had a tough time finding a fabric I was happy enough with to make the dress in. I eventually came across my chosen fabric in the John Lewis January sale and bought it for £6 per metre. It is 100% cotton. Whilst it is not the same as the fabric used on the pattern it still has a vertical stripe which I liked and being from John Lewis I knew it would be a nice quality cotton.
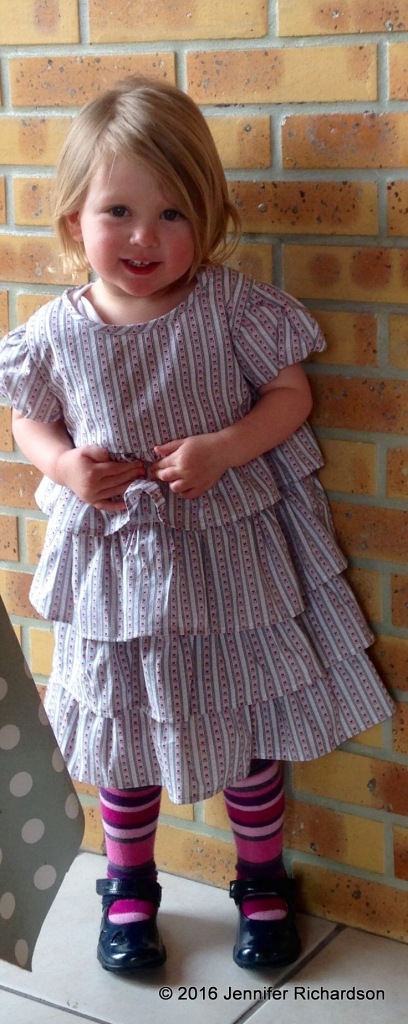
I made this little dress for my niece’s 2nd birthday and therefore cut the pattern out in size 2 hoping there would be a little bit of growing room to at least see her through the summer. I love the detail of this dress with the 4 tiers of ruffles, puffed sleeves, and little button fastening on the back.
I like making things for little humans as you often only need a metre of fabric and you don’t have to deal with darts and things so fit isn’t a massive issue.
The dress has a simple loop and button fastening so didn’t require a zip inserting.
Apart from the sleeves the dress didn’t require lining.
What I didn’t like:
Whilst the construction of the dress is reasonably straight forward there are quite a few pattern pieces to cut out (each ruffle is 2 pieces). Therefore it took a little while to get everything cut out and there was quite a lot of pressing of seams and hems involved.
I found the loop fastening a little fiddly to get right and as a result it didn’t turn out as neat as I would have liked.
Would I make this pattern again?:
Yes, I think this is a very cute little dress. I’ve also bought fabric to make the trousers in the pattern.
I was pretty pleased with the finished dress and according to the free copy of Tattler magazine I was flicking through a few weeks ago to see how the other half live ruffles are apparently in this season! So hopefully my niece will be right on trend wearing her ruffles!
And here’s a photo my brother took of my niece modelling her ruffles…how cute does she look?!
I’m afraid I’ve been a bit rubbish at writing blog posts lately. I have been a little distracted as we’ve been going through the process of selling our house and are now trying to buy another one. Despite this though I have still found a bit of time to sew so I have a few projects that I will hopefully get round to posting about soon! But first I thought I’d write a post about a workshop I went on a few weeks ago…
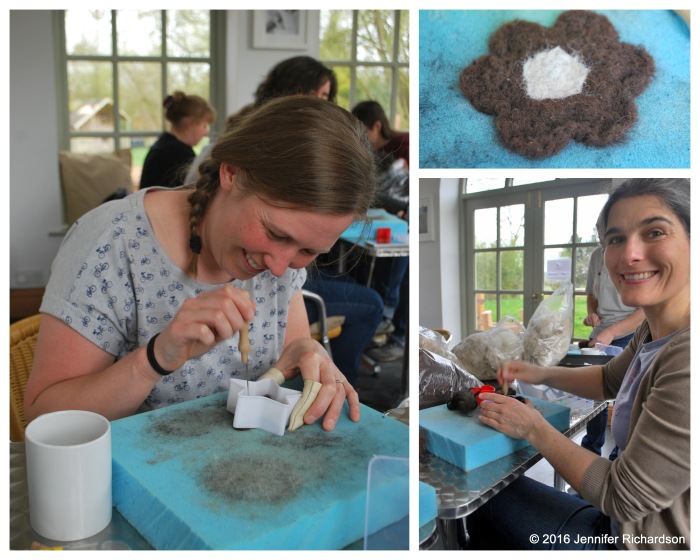
A few weeks ago I attended the Fleece Craft Discovery workshop at Charnwood Forest Alpacas with 2 of my work friends, Jen & Johanna. This was my third crafty workshop of the year so far, which I’m pretty pleased with! We were very excited about this workshop and, of course, about meeting some alpacas…I’m sure they’ll have heard us coming as soon as we started down the drive as we were squealing at every alpaca in sight!
The Fleece Craft Discovery workshop is a full day workshop starting at 09:45 and running through until 16:00. The workshop introduces you to the crafts of spinning, needle felting, wet felting, and weaving.
Fiona started the day by talking us through all the various types of natural fibre available from both plants and animals and handing around various samples for us to feel and guess where they came from. Perhaps the most unusual that I hadn’t come across before was fibre from banana plants! Apparently it has similar properties to silk, but is obviously produced in a more ethical way.
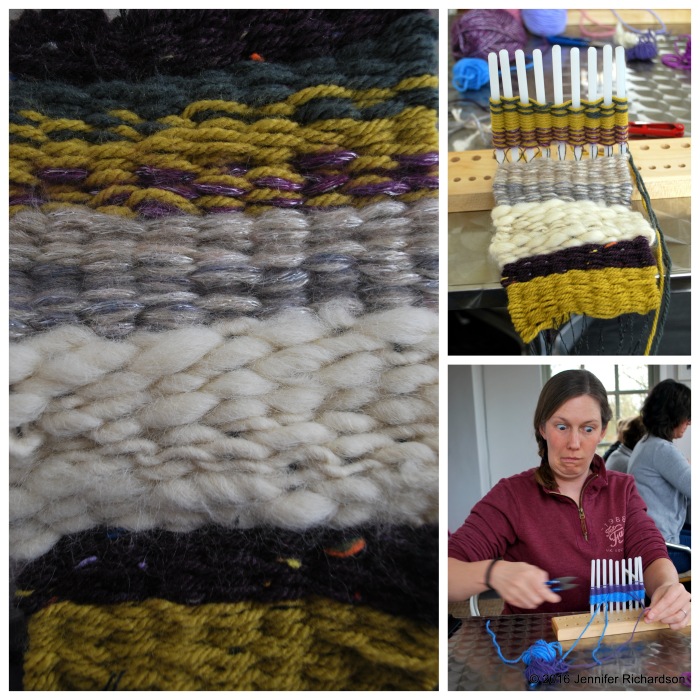
The first craft we got to try was spinning using a drop spindle. Fiona gave us all some fibre and then talked us through the steps in stages starting with pre-drafting. Pre-drafting is the process of thinning down your fibre so you don’t just end up spinning a super chunky yarn. We split our fibres into 4 strips and then worked along each strip in turn with our hands roughly 4-6 inches apart and gently pulled so each strip became longer and thinner. Once we’d prepped our fibre Fiona showed us how to get going on the drop spindle. I struggled to get the hang of it to start with so didn’t think spinning was for me, but towards the end I did feel like I was starting to get it and that perhaps with more practice the penny might drop. However, I’m not sure I could ever see myself starting completely from scratch and managing to spin enough yarn for me to actually make something…I’m too impatient and just want to get going with the main project!
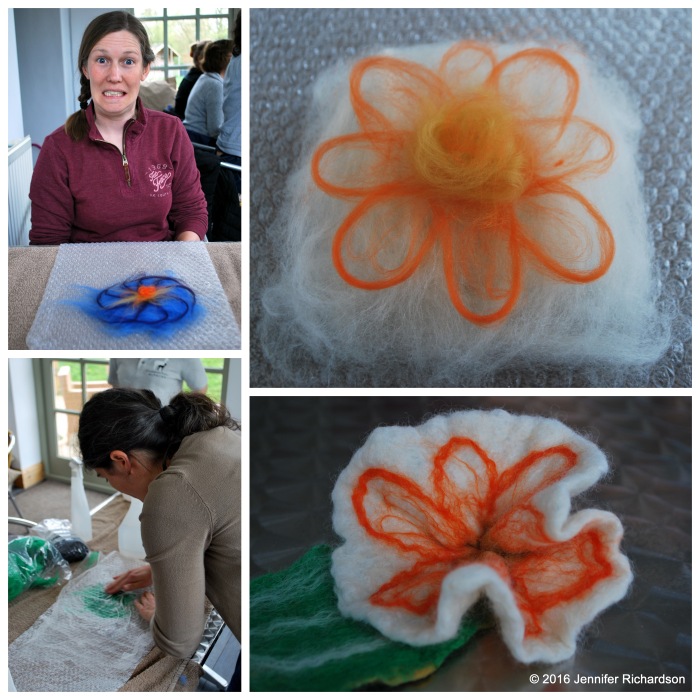
The second craft we tackled was needle felting. We used cookie cutters to create a needle felted shape and we had enough time to produce 2 items. I went for a flower and a heart. I’m looking forward to making use of the cookie cutters I have at home.
We then stopped for a very tasty lunch of bake potatoes with salad, which was included in the workshop fee. Before we got back to crafting Fiona took us to meet the alpacas! There looked to be some real characters amongst them and I think they always look like they’re smiling! We decided we’ll have to go back to do one of the alpaca walks some time.
After lunch we got going with the third craft of the day, wet felting. This was the messiest of the 4 crafts and the one we had all be looking forward to trying most. I did have a go at wet felting years a go back at college, but I couldn’t remember all the steps. I have recently seen pieces of work people have done where they’ve made a piece of felt and then machine embroidered on top of it and would really like to give this a go.
For this session Fiona showed us how to make a flower and talked us through all the steps starting with layering up the fibres for the background and then adding any detail on top. We then laid a piece of netting over our design and soaked it with water using a spray bottle before massaging a little bit of washing up liquid into the fibres to get them to fuse together. After doing this to 1 side, we then flipped the design over and shaped it by folding the edges to the back. We then put the netting back over the top and repeated the process of rubbing washing up liquid into the fibres. Once we were happy the fibres were holding together, we removed the netting and sandwiched our design between bubble wrap. We then used the rolling technique to squeeze water out of the design and in doing so making it shrink and become tougher. We kept repeating this process, but turning our design in between in order to keep an even shape. Finally, we rinsed our design off in a bowl of water to remove any remaining soap. We had enough time to repeat the process to produce a leaf to go with our flower.
The fourth and final craft of the day was weaving using a peg loom. Fiona produced a big basket full of different yarns from which we could pick from. This was quite a relaxing way to finish the day. I incorporated the yarn I spun at the beginning of the day into my design as I thought it would be a good way to use it and it added a bit of variation.
At the end of the day we had the opportunity to buy some of the kits to get going at home. I couldn’t resist buying the needle felting and wet felting kits at £15 each! So I’m looking forward to getting stuck into those!
We had such a fun day on the workshop. The course was really well structured giving us plenty of time to try each craft and produce something to take home. Fiona was a great instructor who is very friendly, knowledgeable and clearly passionate about wool crafts. All materials were included in the workshop fee as well as lunch so you don’t have to take anything along. I would highly recommend this workshop to anyone wanting to have a go at spinning, needle felting, wet felting, and weaving. Fiona said that they are planning to run more workshops focusing on the individual crafts so hopefully I’ll get to go on one of them sometime.
I am a big fan of The Great British Bake Off and The Great British Sewing Bee, but when The Great Pottery Throw Down aired on the BBC back in November I wasn’t convinced it could possibly be as good! However, I thought I would at least give it a chance and watch the first episode. Well, I was hooked and not only that, my husband Steve enjoyed it too AND all our friends at work! So the day after each episode had aired we’d have a discussion about it at lunch and talk about how we’d all really like to give pottery ago.
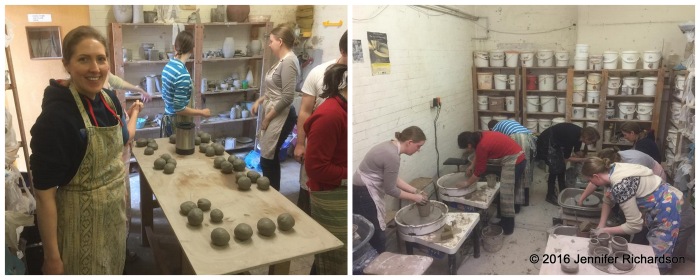
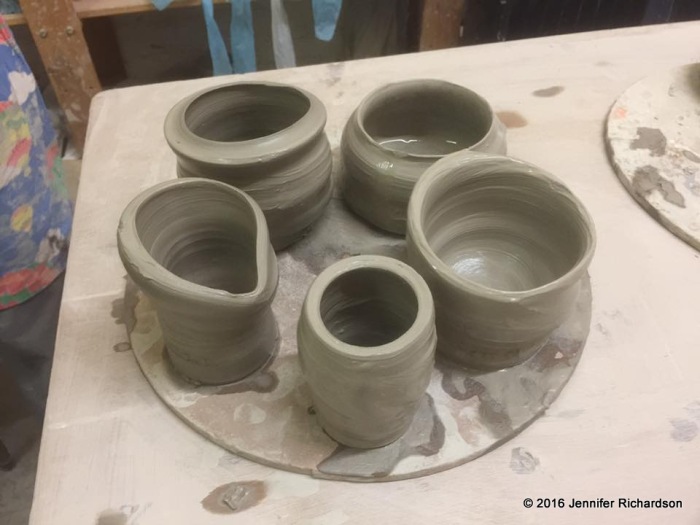
Well 2 weeks ago a group of us got to do just that when our friend Wayne organised a 2 hour throwing workshop at Hands on Pottery in Nottingham for our friend Claire’s birthday. Of course in advance of the workshop we all talked about what we might like to try and make. Trying not to be too ambitious I thought something like a simple yarn bowl would surely not be that hard…I was very wrong!
To start off we were all given a chunk of clay and shown how to wedge it in order to remove any air bubbles. This basically involved repeatedly throwing the clay down hard on to a table, rotating it each time. It is a great stress-buster!
After wedging our clay, we cut the clay in half with a wire to check there weren’t any remaining air bubbles, and then cut the 2 halves in half again to give us 4 pieces of clay, which we then rolled into balls. These 4 balls of clay basically meant we had 4 chances of creating something on the wheel.
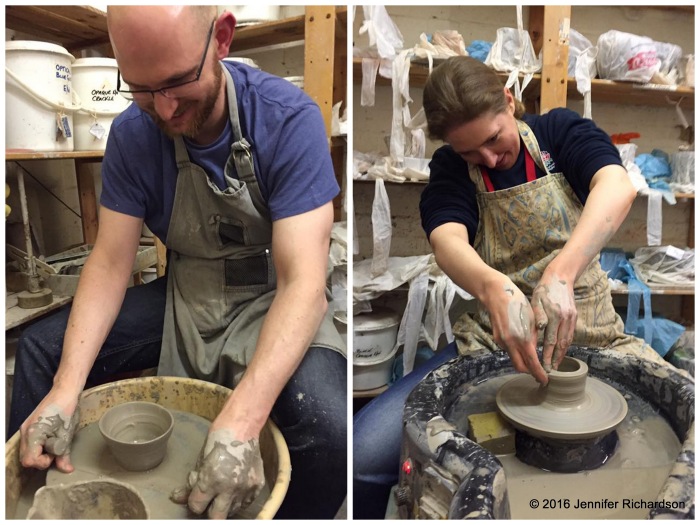
Before being set loose on the wheels we were given a demonstration on how to centre the clay, open it, and thin and raise the walls before shaping the clay into something…our instructor made this all look very simple!
So then it was our turn. I ended up on the easy wheel as it was the only one without a foot pedal, the speed instead being controlled by a knob on the side meaning you could just focus on what your hands were doing and not have to worry about your foot. However, I don’t think it really helped me much! Turns out throwing a pot is really quite hard! By the end of the session though I felt like I was starting to get a feel for centring the clay as on my last attempt I managed to do this without help and was really quite pleased with myself. But where I really seemed to struggle was in thinning and raising the walls. I just couldn’t seem to get a feel for this and every time I started to get somewhere I would start to lose it. The first time this happened the instructor turned around and said ‘Oh look, you’ve created a jug!’ So I left it at that! It is pretty abstract (its on the left in the photo below), but I was pleased to at least have something that could be fired! And then the next time I was getting somewhere the same thing happened again! So it would seem I’m good at accidentally creating abstract jugs!
The workshop went superfast and 2 hours just isn’t enough to really get to grips with working on the wheel. However, it gave us a good taster and I think there will be a few of us that may look at booking onto a longer course as a result. I feel that with a little more time I would start to get the feel of things. If you have thought about giving pottery ago I would thoroughly recommend doing a workshop. We all found it great fun!
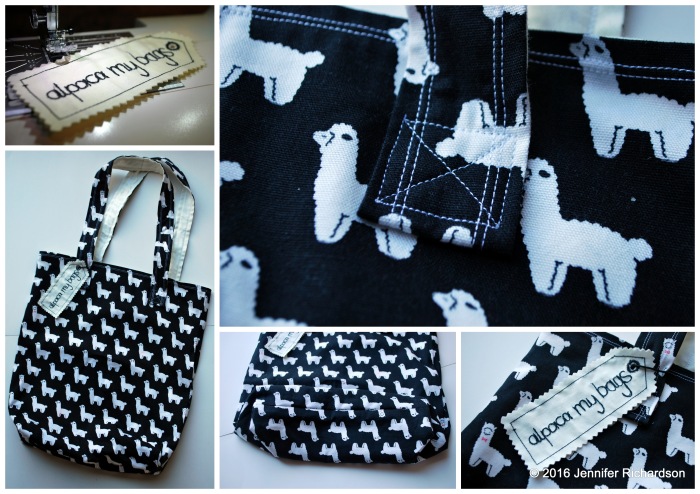
This is a project I worked on before Christmas but hadn’t gotten around to writing up. Please excuse the quality of the photos…the light at that time of year made photographing as I went along tricky!
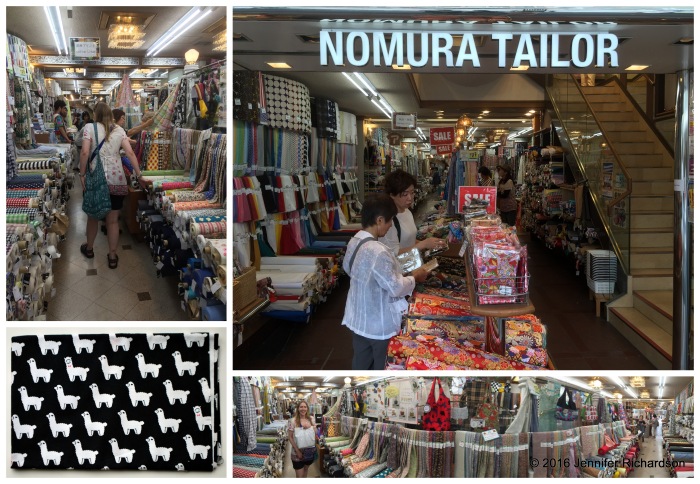
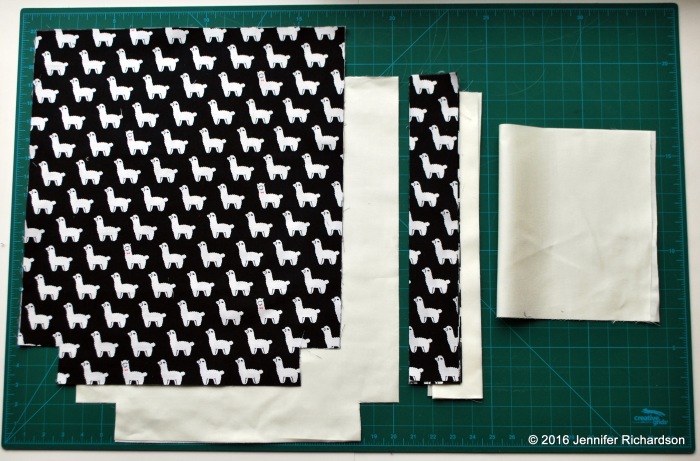
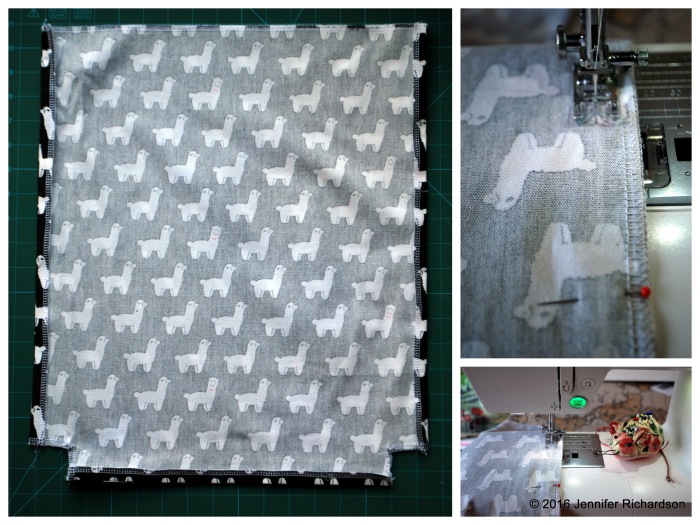
I bought half a metre of this black & white, cotton canvas alpaca fabric from a shop called Nomura Tailor in Kyoto when we were in Japan last July with the intention of making a tote bag out of it as a Christmas present for my brother.
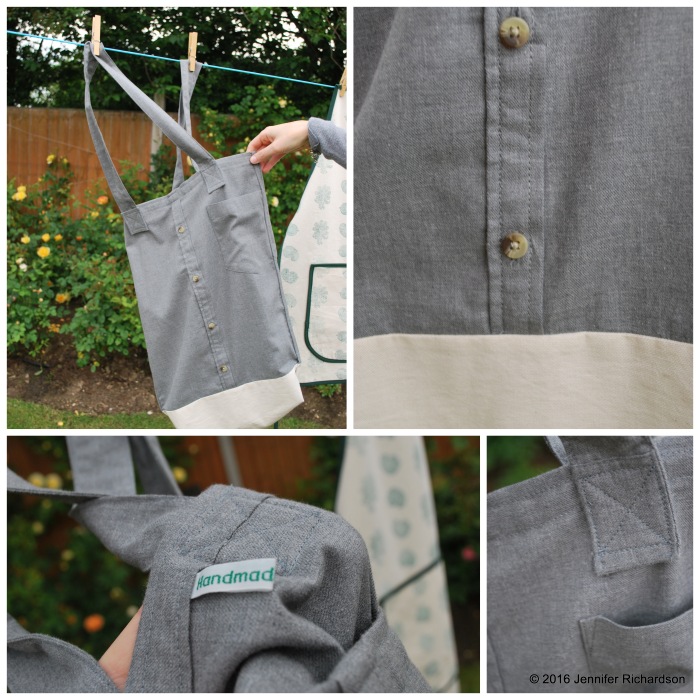
To make a similar lined tote bag with a pocket, you will need half a metre of your main fabric…something like cotton canvas works well as it is pretty hard-wearing, but I have also made one of these bags from a shirt. You will also need half a metre of lining fabric…I used a polycotton lining that I picked up in Dunelm.
To make the bag:
Cut 2 rectangles from your main fabric and 2 rectangles from your lining fabric measuring approximately 17” wide by 19” high.
Cut a 2” square from each lower corner of both the main fabric and lining rectangles.
With half a metre of fabric you may not have quite enough to cut the straps as one continuous length. I therefore cut 4 strips measuring approximately 16” long by 2.5” wide from the main fabric and 4 strips from the lining fabric, which I then pieced together to form 2 long strips of the main fabric and 2 long strips of the lining fabric.
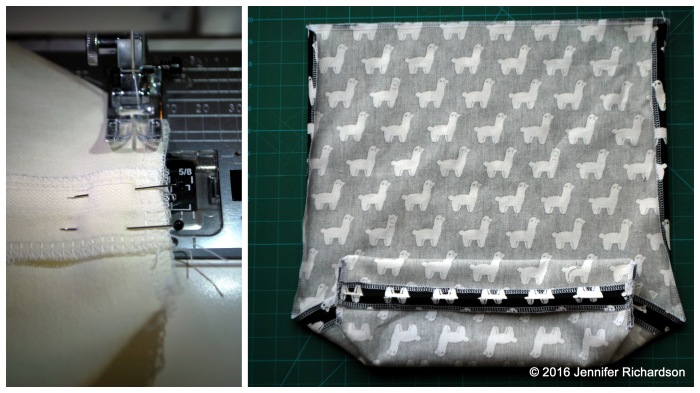
For the pocket, cut a 17” wide by approximately 10” high rectangle from the lining fabric.
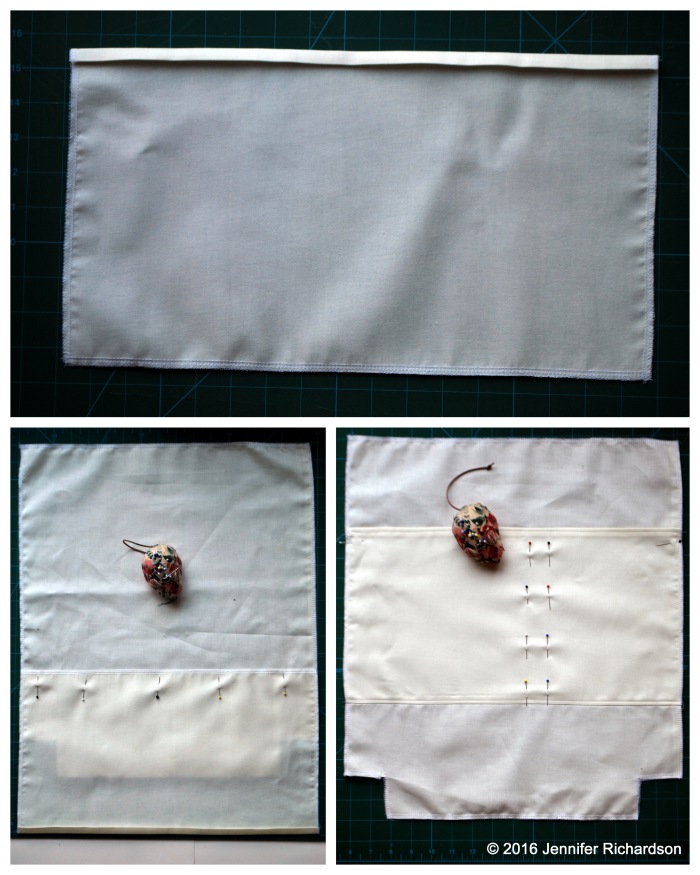
This step is optional, but if you have an overlocker you may wish to overlock all your raw edges to prevent fraying.
Take the pocket rectangle and fold over the top edge by 1cm and press. Fold over again by another 1cm and press. Now stitch along this top edge.
On a flat surface, place the pocket rectangle on top of one of the lining rectangles where you would like the pocket to be positioned. I positioned mine roughly halfway between the top and the bottom of the lining piece. Then fold the pocket rectangle forward so that the pocket is upside down with right-sides together and the bottom edge of the pocket is still lined up with where you want the bottom of your pocket to be and pin in place. Now stitch along the bottom edge. Fold the pocket back up and press along the bottom seam.
If you wish you can add sections to your pocket. Here I have created 3 sections of different sizes to hold things like a notepad, pen & phone. To do this I placed a row of pins where I wanted to stitch to create the sections and then stitch as straight as I could following the pins.
Take the 2 rectangles of main fabric and with right-sides facing, stitch the side seams and bottom seams leaving the 2” corners open. Do the same for the lining. I used at 1.5cm seam allowance. Press seams open.
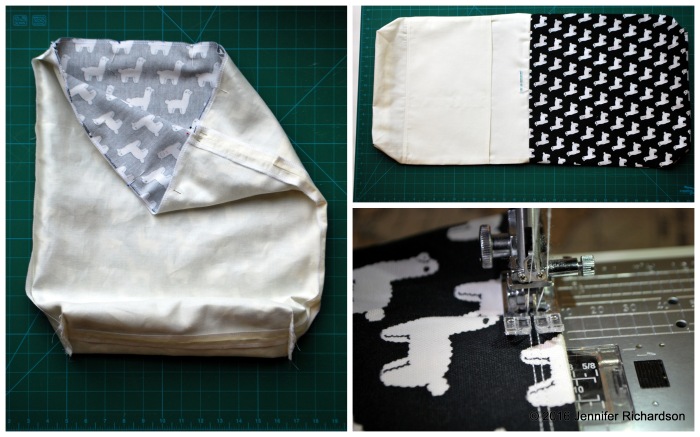
Put the main fabric bag inside the lining fabric bag so that right-sides are facing and lining up the side seams. Stitch around the top of the bag leaving an opening big enough to turn the bag right-side out.
Once you’ve turned the bag the right-side out, push the lining inside the main fabric. Press around the top of the bag and then top stitch all the way round. I used a twin needle to do this.
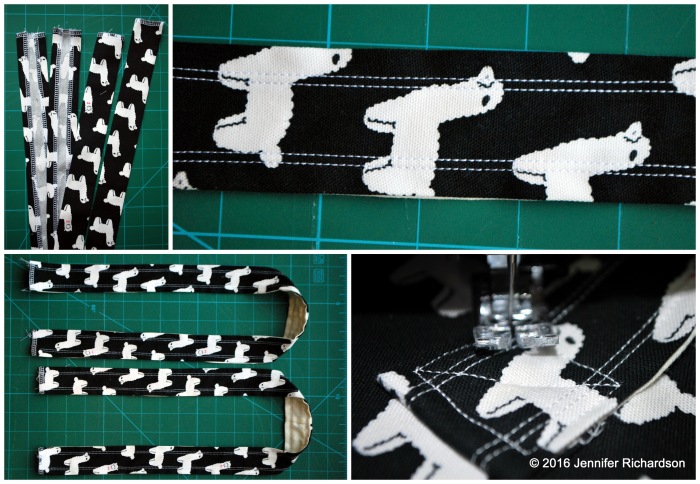
To create the straps, piece together the 4 strips of main fabric and 4 strips of lining fabric to create 2 long strips of the main fabric and 2 longs strips of the lining fabric.
Fold over the raw edge on both long sides of each strip by ½” and press. Your strips will now be approximately 1.5” wide.
With wrong-sides together pin and stitch 1 strip of main fabric to 1 strip of lining fabric. And do the same with the remaining 2 strips. I used my twin needle to top stitch down each side of the strap.
Finally, position the straps where you want them to be on your bag and pin in place. Stitch the straps to the bag.
Last weekend I visited the Sewing For Pleasure show at the NEC with my Mum. We bought our tickets through Tesco Clubcard for a bargain £3! And the tickets not only gain you entrance to the Sewing For Pleasure show, but also Hobbycrafts, Fashion & Embroidery, and Cake International.
I love visiting the big sewing shows at the NEC. They are a great way to stock up on sewing and craft supplies and gather inspiration. Even if you don’t buy anything (which in my opinion is virtually impossible) it is a good day out and is a great opportunity to browse and feel the variety of fabrics in a way you just can’t do online. I love being able to buy from a number of different stalls without having to pay postage and I can feel the quality of fabric before I buy.
I always intend to take lots of photos of all the stalls as I go round the shows, but once I’m in I get far too distracted and forget! But I thought I would share some photos of some of my purchases from the day:
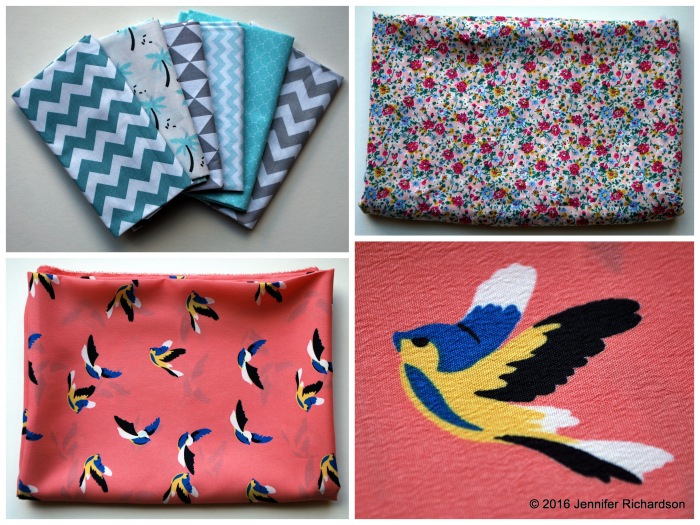
1. I bought 6 coordinating fat quarters from the Favourite Fabrics stand in light green and grey. I always like to visit the Favourite Fabrics stand to look at their fat quarters as they normally have a deal of 6 fat quarters for £10 and on this visit these 6 jumped out at me. I made a quilt for my niece using 6 fat quarters I had previously bought from Favourite Fabrics so I intend to do something similar with these.
2. Floral cotton voile from Abakhan. I intend to make a little pair of trousers from this for my niece using Simplicity 1624 from which I have just finished the ruffle dress.
3. Pink bird fabric from Fabrics Galore. This is a fabric I spotted when I was at Knit & Stitch in Harrogate back in November that I liked, but talked myself out of buying. But when I visited the Fabrics Galore stand last weekend it was sat right on top of everything just looking straight at me so I decided that it was meant to be and bought 1.5 metres of it for making some sort of blouse. It is 100% polyester and I am a little worried it won’t breathe particularly well so I think I might do something sleevless. I did think it would probably make a good lining for something, but I want to make it into a top! It has a slight crinkly texture to it a bit like a crepe.
I also bought a purple Frixion pen…I already have 2 black ones, but couldn’t resist the purple. I got terribly excited when I discovered these pens that allow you to draw on fabric and then the ink magically disappears when you pass an iron over the top! I think my only other purchase was a couple of packs of blank cards from a stall in the Hobbycraft show that sell packs of blank cards for £2.
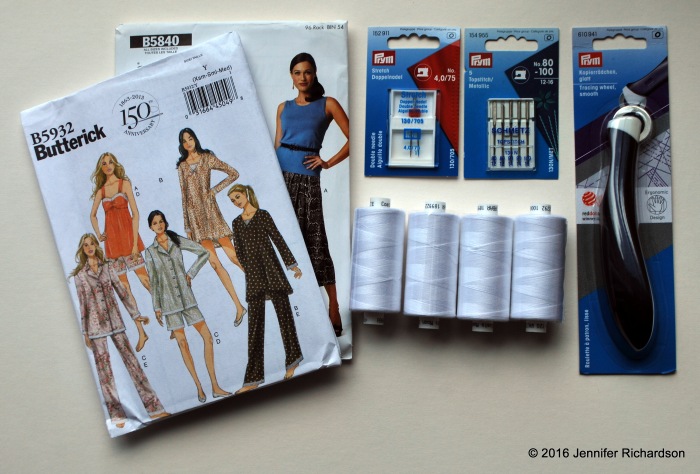
I thought I was reasonably restrained on this visit to Sewing For Pleasure. Mum and I love looking through all the sewing patterns on the Simplicity and McCall’s stands, but I didn’t even buy a single one! However, that is partly because I had just received 2 new patterns in the post that I had bought from the Weaver Dee along with a smooth tracing wheel, a ball point twin needle, a pack of top stitch needles for doing free machine embroidery and 4 spools of Moon thread for my overlocker! You do get free P&P if you spend over £10 after all!
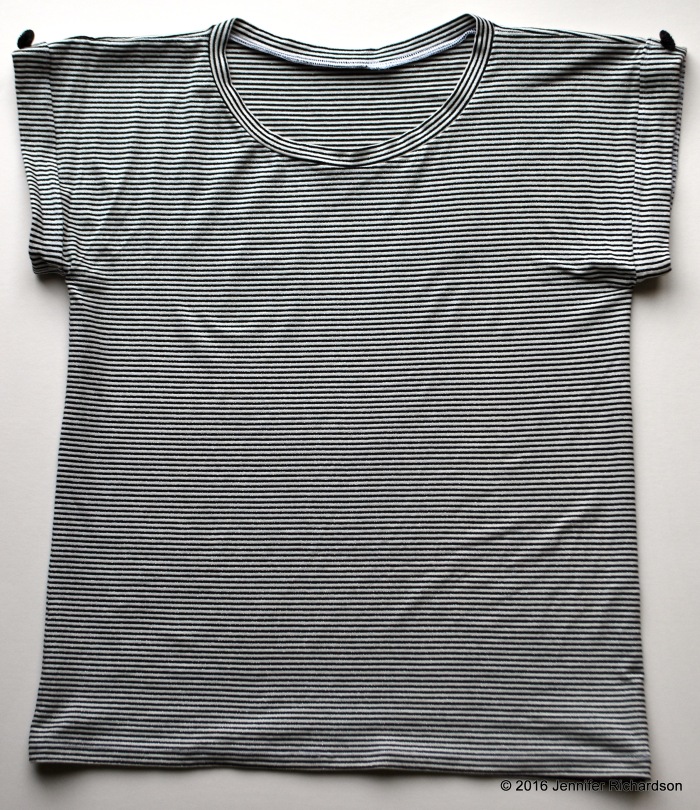
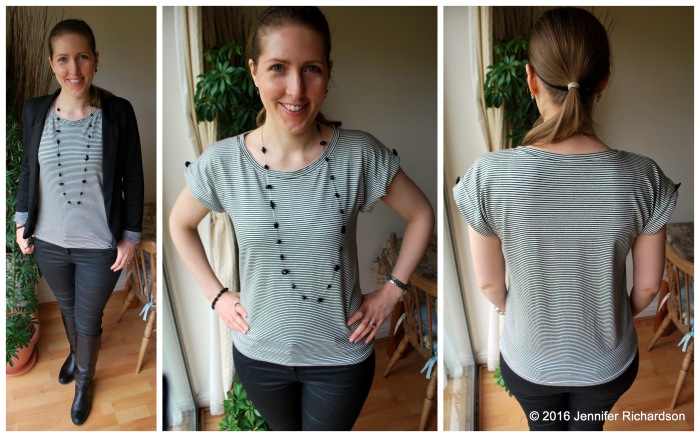
This is the second Emmeline Tee I have made. The first one I made as a secret Santa gift for a friend, which I wrote about here. But this one I have made for myself 🙂
The Emmeline Tee pattern includes 3 versions all of which can be made in woven or knit fabrics, detailed instructions for which are included. I made version 3 for my first attempt at the Emmeline, but this time I decided to make version 1 with the kimono sleeves and turned up cuffs. As with version 3 of the pattern, version 1 only has 3 pattern pieces (front, back, and neckband) so it is pretty quick to cut out the fabric. I cut out a size S, but lengthened it by a good 2 inches. When I made my first Emmeline Tee I found that it only just sat on the top of my jeans waistband. It drives me mad when I have to keep tugging tops down all the time, so for me I wanted to make sure it had enough length in the body that I wouldn’t have to do that.
The fabric I used was a black and white striped jersey with a metallic silver thread running through it. I bought it from Stuarts Fabrics on Leicester market for something like £4 per metre. I didn’t really pay any attention to what the composition of the fabric was. I tend to buy fabric by how it looks and feels as opposed to paying much attention to what it says on the label (besides the price!) and when buying off the market there aren’t really any labels attached to the fabrics so I never really know exactly what I’m buying! But with Stuarts Fabrics a lot of the fabrics have been used by retailers and therefore tend to be reasonable quality. The fabric I bought is lightweight jersey and feels nice and soft so works well for a t-shirt.
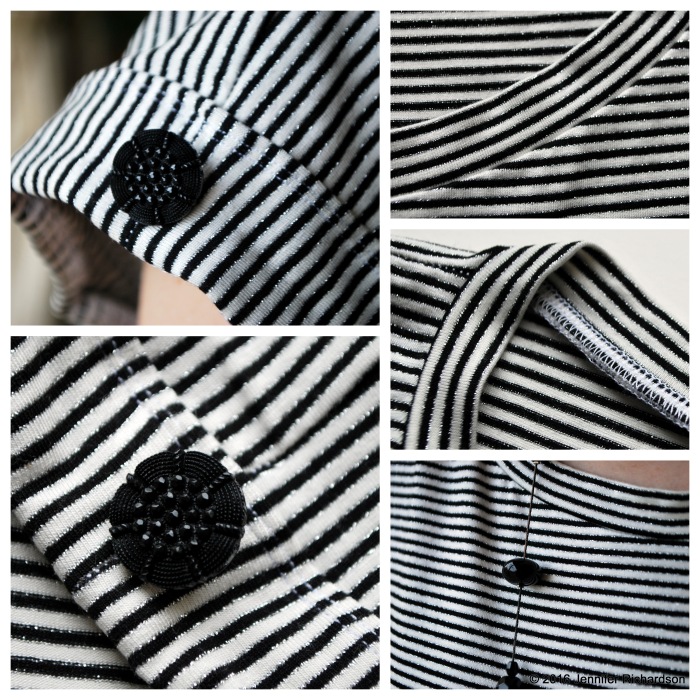
I started by overlocking all the raw edges of my pattern pieces apart from the neckline. Then it was just a case of sewing the front and back together at the shoulder seams and then up the side seams, attaching the neckband and finishing the hems using a twin needle. For the sleeve cuffs the instructions tell you to hand-stitch these in place. However, I’m not terribly patient when it comes to hand stitching so I finished those by top stitching with a twin needle too! As a finishing touch I added 2 buttons to the cuffs. I found these buttons in John Lewis and thought they were pretty and would finish my t-shirt off nicely. I like them, but my husband thinks they stick up too much!
I was really pleased with the finished result and once again I found the pattern straightforward to follow so I managed to make this t-shirt up in an evening after work! I tried to match the stripes up at the side seams…something you’d think wouldn’t be too tricky to do with stripes. In some places I was successful, in other places not so! But the main thing is that the stripes run horizontal and I was very pleased with the stripes around the neckline and neckband.
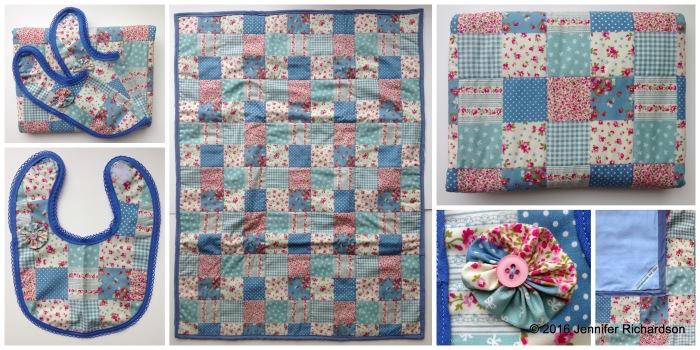
This is a quick and easy project if you’re in need of a gift for a new arrival. From 1m of fabric I was able to make 2 matching quilt and bib sets that I gave as gifts to two friends who were expecting baby girls.
I found this pale blue, patchwork effect, 100% cotton poplin in Dunelm, which was 112cm wide. I thought this would be perfect as it gives the effect of being a quilt without having to sew lots of pieces together!
I cut enough fabric off the bottom for creating 4 bibs.
I quite often make bibs for new arrival gifts as I think they are always useful and I know when my niece arrived my sister-in-law enjoyed having some bibs that were different to the ones in the shops. The pattern I use is one that was in a Village Haberdashery newsletter a while ago and can be found on their website here.
I then cut the remaining fabric in half lengthways and straightened off the edges to create 2 rectangles for the quilt tops.
I had enough wadding in my stash leftover from previous projects to fit the 2 quilt tops. This is a great project for using up leftover bits of wadding, but if you don’t have any leftover wadding then you will need to buy 1 metre.
To back the quilts I used some pale blue flannelette/winceyette that I already had in my stash. If you don’t already have something suitable then you will need to buy 1 metre or you could instead back them with a towel or something like a brushed cotton sheet.
I used some spray adhesive to stick all the layers of the two quilts together and hold them in place. I then used some coordinating blue bias binding bought from Dunelm to edge the quilts and top stitched with coordinating blue thread. And ta-dah, I had 2 finished quick and easy baby quilts.
To finish the bibs I backed them with the same pale blue flannelette/winceyette that I used for the quilts. I edged them with some blue, lace-edged bias binding I already had. I added some Velcro for the fastening. As I finishing touch I used some scrap bits of the fabric to make fabric yoyos which I hand-stitched on to the bibs with some little buttons.
The finished quilts measured roughly 55x73cm (21.5”x28.5”). They are a good pram size and I have been told they are great for car seats too! They could also be used as a changing mat.
Back in November two of my crafting friends and I booked on to the free machine embroidery workshop at The Craft Studio in Nottingham for February to give ourselves something to look forward to post Christmas. At the time it felt like it was ages away, but a couple of weeks ago we finally got to go on it!
I first used free machine embroidery on my fashion textiles course back at college years ago to stitch things like trees and leaves and have also free machine embroidered the odd gift card. Most recently I have free machine embroidered on top of some custom printed map fabric, which I wrote about here. But I had never really incorporated different bits of fabrics into a design to create more of a picture or scene. So this was what I was hoping to gain some tips for doing and despite not being completely new to free machine embroidery I still learnt plenty of new tips from Clare at The Craft Studio that I will certainly be putting into practice to do more free machine embroidery in the future. I always used to blame my old machine having a side loading bobbin for the cause of jamming and getting the bird’s nest of thread, but it would seem this was not always necessarily the culprit!
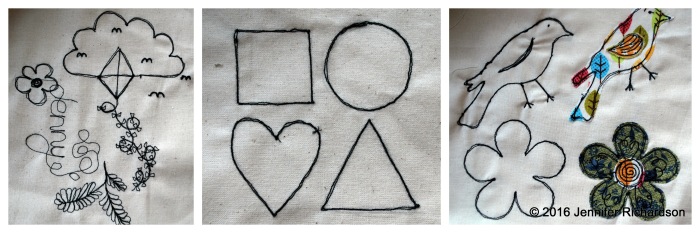
With just 7 people in the class there was a nice, friendly atmosphere. Clare’s instruction was always clear and informative. Clare started us off just doing some simple doodling on to a piece of calico in order to get everyone used to moving the fabric around. We were supposed to just practice going in circles, but I got carried away and started drawing a kite!
Next we moved on to tracing shapes and drew 4 shapes (a square, a circle, a heart, & a triangle) onto a piece of calico with a pencil and then attempted to follow the outlines on the machine.
We then moved on to more complex shapes and tried drawing the outline of a bird and a flower before taking the same shapes and looking at how to applique fabric into the design.
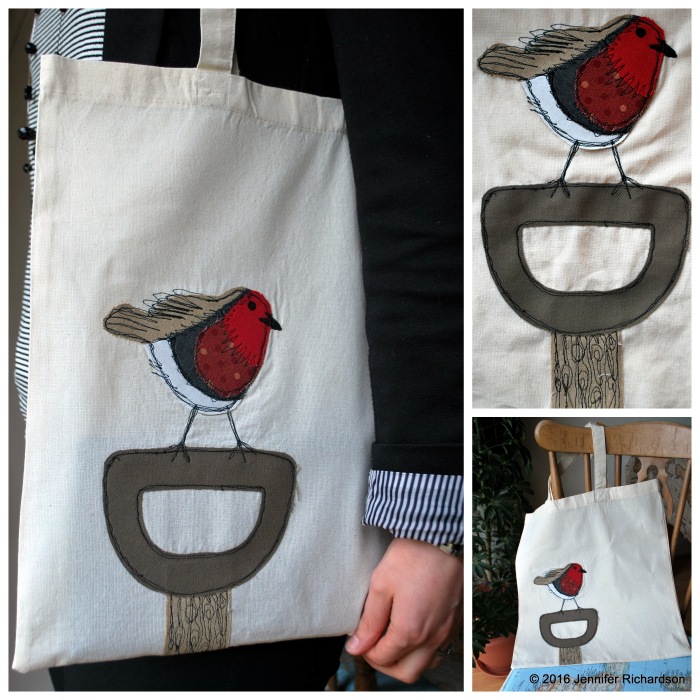
After we had worked through these tasks to gain some confidence we were able to start on our own project of our choosing. I had done quite a bit of looking on Pinterest for inspiration so had found a few ideas, but one of my favourites was a picture of a robin someone had done using different bits of fabric and outlined in a sketchy way with the stitching. So I decided I wanted to attempt to do a similar robin and liked the idea of sitting him on top of a spade handle. After rummaging through Clare’s scrap fabric bags to find some suitable bits of fabric for my robin I set about drawing out my design and cutting everything out. I attached my design to a calico tote bag and I was pretty pleased with the result. I must have been concentrating so hard trying to ensure I finished my design before I left that I was completely wiped out by the time I got home!
At the end of the workshop we were able to look around The Craft Studio shop and we all stocked up on supplies to get us set up with free machine embroidery at home. We had such a fun day and I would highly recommend doing a workshop at The Craft Studio if you get the chance.
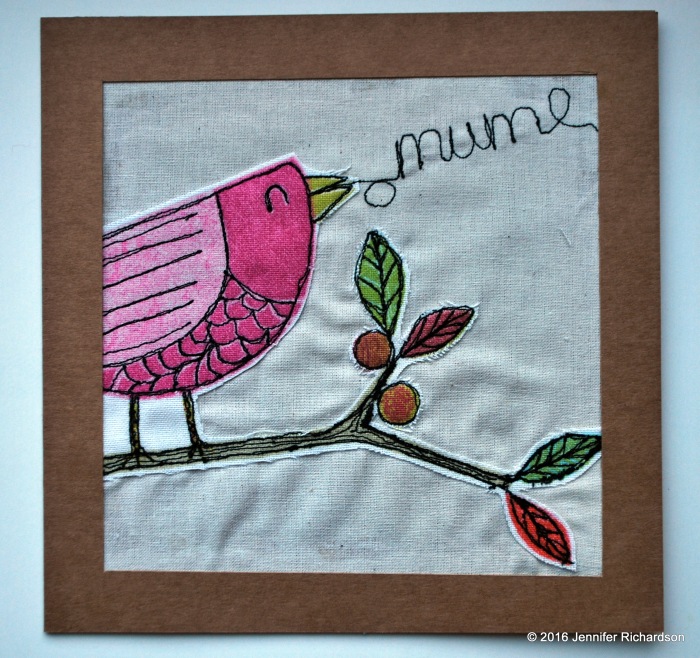
Last week I put my new skills into practice to make this Mother’s Day card for my Mum, which she loved!
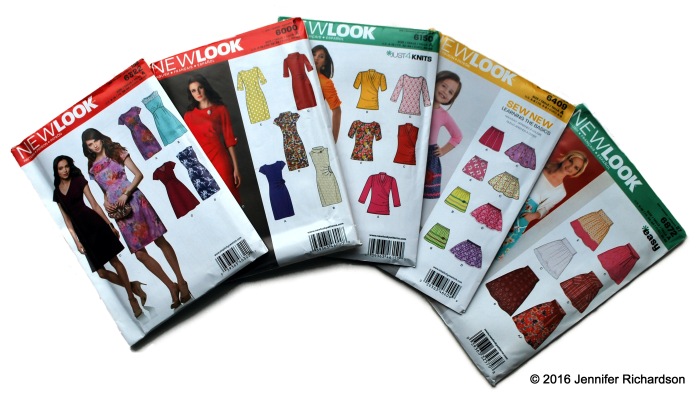
A few days ago I received the Simplicity New Look newsletter informing me that New Look sewing patterns were currently half price on their website. This ignited a conflict in my head with one voice telling me I have enough sewing patterns and the other voice was shouting over the top that they’re on sale! My sewing pattern collection is growing quite large now and I have yet to make up most of them. But I love a sale and at £2.98 a pattern the sale voice won and I caved in to buying 5 new patterns to add to my collection.
This is probably my favourite of the 5. I fell in love with the neckline of view C & D and the pleats on the bust. I also like that it can be made up in both woven fabrics and knits. I didn’t feel I had anything with a similar neckline already and further justified it as I thought it may work for some fabric I bought back from Japan last July!
This pattern reminded me a little of the Sew Over It Joan dress (I think its the neckline of views B, C & D), which I already have and have yet to make. But, like 6322, I liked that it can be made in both woven fabrics and knits and hence it made it into my basket! I also liked the side ruching.
This pattern I bought with my niece in mind who is nearly 2. It is a very basic skirt pattern so not one I would buy full price. But at half price I thought it was worth having so I can hopefully whip up some skirts when she’s a little bit older without have to use my brain too much.
Again this is a basic skirt pattern I wouldn’t have bought full price. I have some fabric my Mum bought me back from Japan that I have been meaning to make into a skirt like this and was going to try and do it without a pattern. However, for £2.98 I thought it was worth just buying it and I liked that this one comes into the waist as opposed to being designed to sit lower.
I have started keeping a record of the patterns I own using a Pinterest board so I can easily see what I have and therefore when I am looking at patterns I can better judge where I may have gaps! But perhaps I should also unsubscribe from receiving newsletters informing me of sales so I’m not tempted to keep buying more patterns before doing something with the ones I already have! And don’t get me started on fabric…
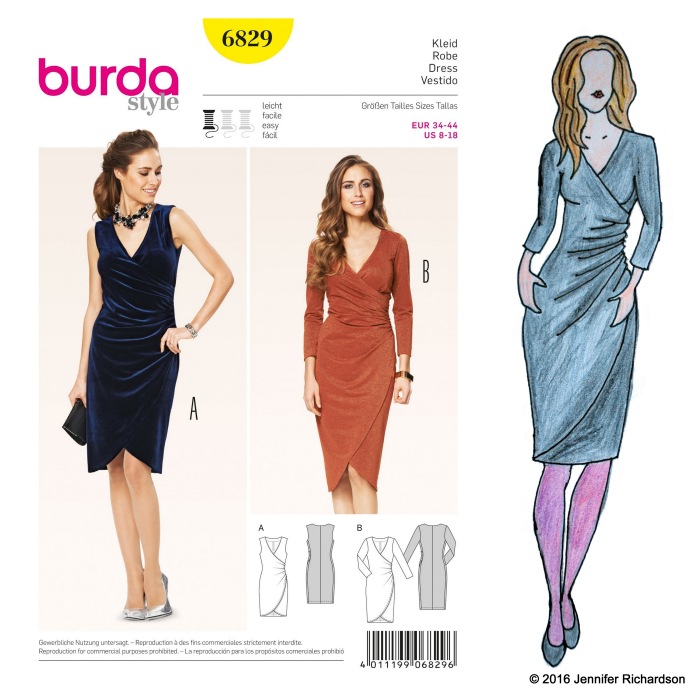
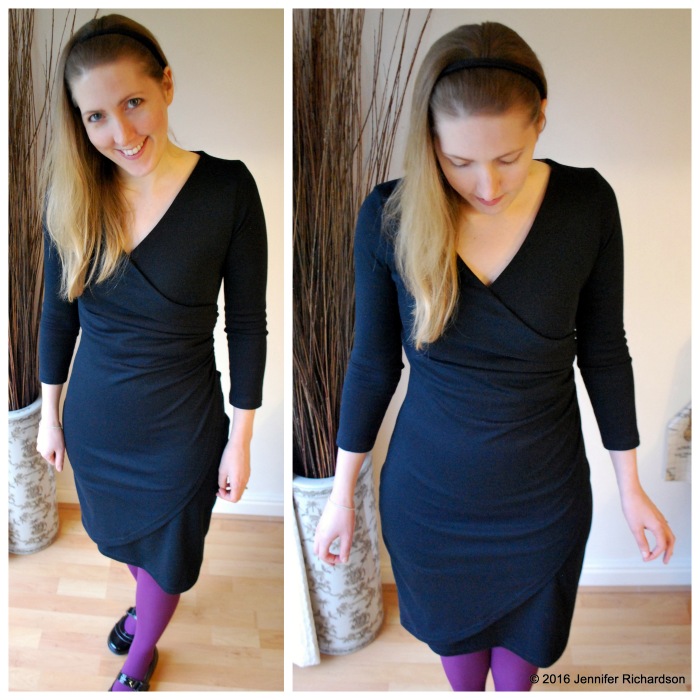
I made this dress before Christmas, but hadn’t gotten around to posting it. This was my first dress using stretch fabric! I bought some black knit fabric on Leicester market a while back that has been sitting in a box waiting to be used along with Burda’s 6829 pattern that I bought with the fabric in mind.
I made it with long sleeves, but the length of view A and I straightened the hem of the underneath panel so that just the top layer swooshes up as I thought it would make it a little less evening-y. And I’m pretty pleased with it!
The fabric was quite easy to work with and thankfully I didn’t have to do much in the way of unpicking as trying to unpick black stitches on a black knit was a little tricky!
When sewing with woven fabrics your finished garment measurements should be larger than your body measurements (referred to as positive ease) to allow breathing room to move around and sit down. In contrast, stretch fabrics have more give in them so to make a garment that is close fitting with stretch fabrics the finished garment measurements should be smaller than your body measurements, which is referred to as negative ease. My bust and waist measurements put me at a size 14. The finished garment measurements for this size were only ½” smaller than my measurements, which I didn’t think was a lot and I wanted my dress to fit snuggly. So I decided to cut the size 12 instead. My hip measurements put me at a size 18…yes I am pear shaped! So when tracing the pattern I graded out from a size 12 at the waist to size 18 on the hip. I didn’t go down a size on the hip as I didn’t want it to be too clingy in that area.
Before I started sewing any seams, I overlocked all my edges. When sewing the seams I used the stretch stitch zig zag that looks like a lightning bolt. I did buy a ballpoint needle…but I forgot to use it! I don’t think my seams suffered too much for it though. All the hems were finished using a twin needle.
Pretty quick and reasonably straight forward so would agree with the pattern difficulty level being classed as easy.
I didn’t really have to make any fit adjustments. Using stretch fabric is more forgiving in this respect I think. However, I don’t think the bust dart is in quite the right place, but it is too noticeable with the black fabric. And having worn it a couple of times now I do think I might have to widen the shoulders slightly as I don’t think they’re sitting quite right.
There was no faffing around with zips or buttons.
What I didn’t like:
The instructions are not as linear as I would like. Step 1, for example, states that the hems should be finished with a twin needle, but it didn’t really specify whether you needed to do all the hems at the start or not. The top panel certainly needed hemming before sewing the seams. So you need to read the pattern through at least once before you start, which I guess is good practice anyway. Because of this I don’t think I did things in the exact order of the pattern.
Would I make this pattern again?:
Yes, definitely. I think I could make it quicker a second time round. The dress is very comfy and I can picture it in some different colours.

 However, this is one of those patterns where I struggled to see the dress in anything other than the fabric used on the front of the pattern! I therefore had a tough time finding a fabric I was happy enough with to make the dress in. I eventually came across my chosen fabric in the John Lewis January sale and bought it for £6 per metre. It is 100% cotton. Whilst it is not the same as the fabric used on the pattern it still has a vertical stripe which I liked and being from John Lewis I knew it would be a nice quality cotton.